| Product Description : | |
| The ultimate in miniature surveillance technology available. Allow you to change the frequency on the camera and receiver to get the best reception. The extremely small camera is portable and easily concealed. The tiny Wireless Eagle-Eye will transmit up to 328ft/100m. It can be used with a 9V battery or the mains power adapter included in the kit. | |
| Product Features : | |
| - Avoid interference by switching camera & receiver between up to 4 channels - Use auto-switching receiver to skip channels not in use - Tiny camera can be concealed almost anywhere - Clear color video images up to 328ft/100m - Receiver can be easily connected to DVR, VCR, TV, AV Monitor or PC (with Capture Card) - Camera totally portable by connecting 9V battery (batteries not included) | |
| Product Specification : | |
| Image | |
| Sensor | Color , CMOS |
| Resolution | 380 TV Lines |
| Pixels | 628 x 582 (PAL), 510 x 492 (NTSC) |
| Auto Exposure | 1/60 - 1/15000 sec |
| Backlight Compensation (BCC) | No |
| Wired or Wireless | Wireless |
| Frequency | 2.4GHz |
| Transmission Range | 100 - 150ft (30 - 50m) |
| Cable Length | 3ft (1m) - receiver only |
| Camera Channels | 4 - switchable |
| Receiver | Included, 4 channels switchable |
| Visibility | |
| Visual Distance | Sees up to 330ft (100m) |
| Lens Focus/Visual Angle | 60 |
| Night Vision | |
| Number of infrared LEDs | N/A |
| Range in the dark | N/A |
| Other Features | |
| Camera Suitability | Indoors |
| Water Resistant | No |
| Audio Range | N/A |
| Monitor | Not included |
| Power Consumption | Camera: 8 ~ 9V 200mA Receiver: 8V DC |
| Camera Operating Power | 8V DC |
| Camera Operating Temperatures | 32F to 122F (0 degree C to 50 degree C) |
| Stand | Included |
| Tilt/Adjustable | Yes |
| Weight (out of pack) | 1 lbs (570g) |
| Package Contents : | |
| - 2.4GHz Wireless Eagle-Eye - 2.4GHz Receiver - Receiver Antenna - 1x AV Cable - 2x Power Adapters - Mounting Bracket - Quickstart Manual | |
Sunday, January 31, 2010
Swann Wireless EagleEye
Saturday, January 30, 2010
Portable Hard Drives
The eGo is fast and it has a unique design (read: it's red and shiny). This $100 drive has FireWire 400 and 800 ports to complement a USB 2.0 port, and it comes equipped with two pieces of useful software--Retrospect Express and Iomega QuikProtect--to simplify backups.
Friday, January 29, 2010
Free Up Hard-Drive Space, Fast
Hard-Drive Spring Cleaning
 Average hard-drive capacities are growing every year, so most people don't practice the same miserly storage habits that they did when megabytes (or even kilobytes) were scarce. But it's still a good idea to give your drive a fast sweep from time to time to reduce clutter and avoid filling it up prematurely. Follow these steps to eliminate junk and reclaim wasted storage quickly.
Before you do anything else, empty your Recycle Bin by right-clicking on it and choosing Empty Recycle Bin. Even the most hardened Windows veteran can occasionally forget that they left a few DVD images in there.
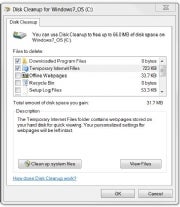
 Open the Disk Cleanup tool; typing Disk Cleanup in the Start menu box should bring it up, or else you can find it under Start, All Programs, Accessories, System Tools, Disk Cleanup. Select the volume to clean. After it's done scanning your drive, it should tell you how much space you can free up by deleting different kinds of files, including cached Web pages, temporary application files, reports from Windows Error Reporting, and so on. Check and uncheck items at your pleasure, but keep in mind that the space you reclaim by clearing your temporary files or Web browser caches will fill right up as you start browsing again and using applications; if you need that space to store something else, you'll need to clean even more.
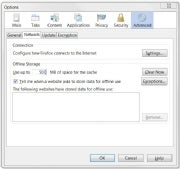 Disk Cleanup doesn't cover all of your PC's caches, either--especially if you're using a browser other than Internet Explorer. Here's how you can clear your cache with different browsers:
Firefox: Go to Tools, Advanced, Network. Click the Clear Now button to clear the cache, and adjust the amount of space that the cache uses down to what you can spare.
Safari: Enable the menu bar (click the gear in the upper-right corner and choose Show Menu Bar) if you haven't already. Then choose Edit, Empty Cache.
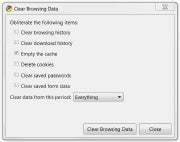
Google Chrome: Click the wrench icon in the upper-right corner, and go to Options, Personal Stuff, Clear Browsing Data. Here you can check what kinds of data to delete; check Empty the Cache and select Everything from the drop-down menu.
Find More Disks
Even if your hard drive is full, you probably have a handful of other disks that you can temporarily draft into extra storage duty. Obviously, other computers on your network can pull their weight, too; but if you're in an office or school environment, you might have access to a network drive for storing some stuff. Just check with a system admin to make sure it's okay before you start any file transfers.Also, you likely own a handful of other devices that could help: A portable media player, a flash memory card, a USB thumb drive, or even the internal memory of a camera or phone can mount via Bluetooth or USB and act as a removable hard drive. Keep note of where you're storing your files, though, or you might find yourself missing something important later on.
Don't overlook your humble optical drive, either--any remotely recent computer should be able to burn CDs and DVDs, and even when most stores are closed you can still find blank optical media at an all-night pharmacy or convenience store.
If you don't have enough local storage, you can try to keep files on the Internet. Online storage services such as Box.net can provide you with an extra gig or two of storage space if you're willing to put up with the hassle of uploading and downloading your files. Also, Google recently expanded its Google Docs app to allow users to store any file up to 250MB, with 1GB of total file storage for free.
source
Thursday, January 28, 2010
HP's Speedy MediaSmart EX495 Server
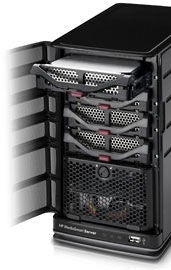 With the addition of more processing power (2.5GHz versus 2.0GHz), HP's MediaSmart EX495 not only bested its EX487 stablemate that we reviewed earlier this year, but proved to be the fastest network-attached storage box we've ever tested. Move over, Synology DS209+ II! The EX495 was particularly fast during virus scans and at finding files thanks to the indexing feature of its Windows Home Server operating system.
Tuesday, January 26, 2010
Samsung's C9000 3D HDTV Ultra Slim Design
In CES 2010 show, Samsung showed the upcoming C9000 HDTV model, which is ultra thin and lightweight. This HDTV has 3D support feature and has 240Hz technology.
The thinness is achieved by shoving lots of guts into the pedestal, along with all of its various USB and HDMI slots, which doubles as a wall mount. The set can convert 2D content into 3D.
The remote doubles as a mini-smart phone looks rather Apple-ish in UI, it can show you the content from other sources, like live TV while watching a Blu-ray on the big screen. There is no official announcement for sizes or prices.
source
Monday, January 25, 2010
Limited edition Casio Hello Kitty Digital Cameras
To celebrate the 35th anniversary of Hello Kitty, Casio in Korea has launched a new camera model: limited edition Hello Kitty EXILIM EX-Z90. There are other cameras such as Hello Kitty EX-Z2 and Hello Kitty EX-Z80.
The camera was introduced and designed simply as the Hello Kitty Casio and is available in pink and red. It has been decorated with some crystals. In addition, to complement its nice appearance, Casio offers the Hello Kitty Casio EX-Z90 with a photo camera case, which is themed with Hello Kitty prints.
Similar to the original model, this compact EX-Z90 camera has a 12.1 megapixel sensor, 3X optical zoom, ISO sensitivity of up to 1600, and a 2.7-inch LCD screen.
The Hello Kitty version of Casio EZ-90 costs 350,000 South Korean wons, which is equivalent to about US$ 300.
Source
Sunday, January 24, 2010
Linux Gadgets Dominate Windows netbooks in CES 2010
While new Atom-based Windows netbooks did show up at CES 2010, the focus of many in CES 2010 show are on the ARM based Linux Gadgets instead of Wintel mobile PC platform.
ARM based Linux Gadgets are dominated including number of smartbooks, e-readers and tablets. Lenovo demonstrates a working model of ARM-enabled netbooks named “Lenovo's Skylight”, are outfitted with Qualcomm's Snapdragon chips. Plastic Logic's Que e-reader uses ARM processors from Marvell. Freescale, another ARM chipmaker, rolled out a reference platform for a sub-$200 tablets.
nVidia showed five tablets based on its ARM-based Tegra chips, varying in form factor and OS among vendors. ICD Vega's Tegra tablet runs Android, whereas Foxconn's runs a custom Linux distribution.
On the other hands, LG unveiled its first ever netbook, choosing Intel's Atom and Microsoft's Windows XP as the underpinnings. LG is also giving lots of thought to smartbooks and mobile gadgets in other shapes and sizes, said LG VP John Taylor, speaking with Betanews at CES 2010.
Source
Saturday, January 23, 2010
SONY Gadgets: Dash Tablet 2010
The Sony’s dash is the latest tablet device to be an inexpensive gizmo designed for users to access Internet and Internet applications. The device estimated costs around US$199. Sony unveiled the device at CES 2010 trade show in Las Vegas.
The device is 7-inch touch screen with built-in wifi that allows to access over 1,000 specially written Internet applications, for news, calendaring, weather, sports, social networking, Internet chat,play music, mobile gaming and much more.
The device got build-in internal accelerometer allows for two viewing angles: upright, ideal for a table or nightstand or titled or even for countertop. The concept of its design is to be light weight and provides long battery life as “personal internet” device.
It also supports multiple user profiles and channels, profiles and channels, allowing several members of the household to create and maintain their own customized view of the Internet.
Source
Friday, January 22, 2010
2010 Brings Your Computer and TV Closer - CES Gadgets

Over the last year we’ve looked at a couple of good media server options that make integration from your computer to your TV seamless. We’re starting to see some of these devices make the switch to new controls that allow the user to control their devices over a wireless network instead of needing to be in the line of sight for a remote to work. So, it’s no surprise to us that ThinkFlood took the initiative to eliminate the piles of remote controls that are amassed with multiple electronic devices around the TV, and instead use the iPhone or iPod Touch to control everything. The Redeye iPhone Universal Remote turns your iPhone or iPod Touch into a universal remote that will allow you to control your TV, stereo, DVD or BluRay player, and even game console(s)- basically all home entertainment devices with infrared capabilities, from anywhere in the house. It works using your wireless router- there are detailed instructions on how to set this up and we were impressed that it was really quite simple. Probably the coolest part is that each iPod Touch or iPhone device in the house can be used independently and even simultaneously on the same devices. The system is modular, which means that not only can you have any number of iDevices controlling entertainment media, but you can also have any number of RedEye bases in the house, giving you multiple entertainment system options. The RedEye is available directly from Thinkflood for $188.

You do have to be sitting in range of your TV to use the GlideTV Navigator remote, but it doesn’t stop us from liking it anyhow. This little guy eliminates the need for a keyboard and mouse when using a computer as a media server, and fits nicely into the palm of your hand. Basically, it’s set up so that the touchpad will control your menu searches, and even provide your keyboard. The buttons around the touchpad serve as your escape, enter, back, and function keys to control applications, and the media buttons control the playback of the files- play, pause, rewind, fast forward, etc. The Navigator also offers easy allow access to Google, Amazon Video on Demand, Hulu, Youtube, and Netflix, and even works with the PS3. We liked everything about this device, with the singular exception of the onscreen keyboard. We’re fairly used to small touchscreen keyboards, but even with hours of practice on our iPhones we still found it a bit frustrating to use. However, that’s not really a deterrent either, given how well the rest of the device functions. Videos were easy to find, and the range of the remote is impressive. The battery life is decent, and the charger is not intrusive, so it’s easy to just keep it docked when it’s not in use. Overall, this is a far better option than having a keyboard and mouse stashed near your media server, and it’s plug-and-play thanks to the USB dongle. It’s shiny, fun to use, and functional- what more could we ask, really. $150 may seem pricey for a remote, and it is, but this is quite a bit more than just a remote. Well worth the money if you’re invested in your entertainment and media center.

The last of the TV/PC gadgetry in our lineup is The Loop. The Loop is more like a traditional air mouse, with a click-wheel and four buttons. It’s outstanding for giving presentations, being much more manageable than most wireless air mice. The trend for entertainment is in computers and media centers, so of course it would have been foolish to create a mouse like this that didn’t work with a media center. The Loop connects to your computer over your wireless network, and can access all of the places that we use to kill time- YouTube, Hulu, Netflix, etc. Because it connects to your computer you can also use it to control WMC and iTunes. Aesthetically it’s interesting- a large ring, which even our largest hands here fit into. It’s easy to manipulate, and the buttons and scroll wheel are in a very comfortable spot. There was discussion among staff here that this might be a useful device for our more tech-savvy grandparents, given the size, shape and ergonomic placement of the controls. Of the three controllers we looked at, this one is the most economically priced, at $99.
All three of these devices can serve a purpose in the home theater toolkit, whether you’re looking to get rid of the remotes or need a new and more convenient way to interact with your TV. We did see a wide array of other hardware in the category at CES- various vendors are looking at included Wii-like controls in their remotes, and a few other companies are exploring iPhone universal remote controls. But all three of the devices have the advantage of being available and pretty well-rounded today.
Source
Thursday, January 21, 2010
Wubi Install Ubuntu inside Windows w/o Partitioning
Wednesday, January 20, 2010
30 Minutes FREE Calling to India & Aboard
Tuesday, January 19, 2010
Use your own domain with hotmail
Monday, January 18, 2010
Breaking Administrator’s Password
note:- this method works only if hard drive is FAT32 formatted because NTFS drive does’nt take boot from Ms DOS
This way you can remove the old administratOr password as if the windows is newly installed and the password was’nt set.
Sunday, January 17, 2010
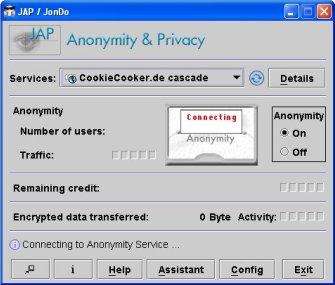
when Orkut is Blocked..Surf Anonymously using JAP!!
But no problems….. Download JAP & Download Ultrasurf and easily surf any blocked website with anonymity
Step 1: Download JAP or ultrasurf
Step 2: Execute Setup file [may take few minutes depending upon internet speed]
Step 3: Change you Explorer LAN connection settings
Change the default gateway IP to 127.0.0.1 and port 4001
Thats it you have gained independence to free to surf any website….
Saturday, January 16, 2010
Find the “real” IP address of a web site

Friday, January 15, 2010
Cool sites for hacking tutorials
1. www.hackersplayground.org
5. www.insecure.org
Open Source penetration testing tools like tools like nmap, various exploit code , etc.
Thursday, January 14, 2010
Windows Applications Seamlessly Integrated On Linux cross over
One Application: Two Delicious Flavors!
Linux in Command line mp3 player
I made my mind up to listen songs as i usually do (it contributes to my hobby). In fact, i was suffering with a headburst headache, so i thought songs might be the stress buster and good entertainer too. What striked my mind was why couldn’t i play the tracks on command line rather playing’em in traditional RhythmBox or Amarok etc. The way i thought, the way i found…some googling let me find such a tool named mpg123, which is nothing but a command line player cum MPEG streamer.
Installation on Ubuntu/Debian:
sudo apt-get install mpg123Installation on RedHat/Fedora/Cent OS: For this, we have to first enable the rpmforge repo and try
yum install mpg123and you are done.
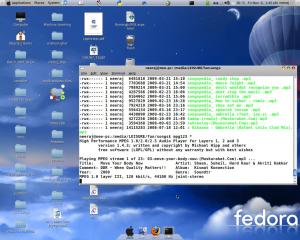
Go to the shell; Move into your songs folder; and type in mpg123 * as below:
neeraj@nee-pc:/media/LEISURE/fun/songs$ mpg123 *Just press Ctrl+C , if you want to switch onto the next song in the folder.
Have a glimpse of the mpg123 on my UbuntuBox:
man mpg123 and you will see what else can you do with this versatile thing.Friday, January 8, 2010
Security Tips for CD
One and only argue to apply such that simple defenses are to protect versus the questionable "ripping" of bets on. "Ripping" denotes to the removal of ample merely inessential portions of the game, like music, animation or DirectX. The shriveled games are then packed together so that people on slower connections could download them from the cyberspace, therefore importantly maximizing the amount of pirated copies.
The classical compact disk checkers have their place in the globe, and while correctly programmed, could cause troubles even for the finer crackers. All the same, these protections are frequently easy to discover and bump off.
Viruses , Worms and Trojan Horses
Friday, January 1, 2010
How to Enable Folder Previews In Snow Leopard 4?
This is a very simple little trick which you can enable in Snow Leopard. In essence it provides a thumbnail preview of the contents of any folder. This is quite useful for quickly looking inside a folder. All it involves is a simple Terminal line.
The first step is to disable any Quicklook plugins you may have installed. For example you may have installed the Folder Viewer. This is found in /Library/Quicklook . Simply delete the .qlgenerator file or move it out of the folder. This will remove the plugin from the Quicklook program. The next step is to apply the Terminal code.
Open up Terminal, located in Applications > Utilities. Copy and Paste (or type) the following.
defaults write com.apple.finder QLEnableXRayFolders 1;
killall Finder;
This will apply the code to enable previews and restart Finder for the changes to take effect. Its not that useful, however if you don’t have a plugin it can be an added bonus. Since it runs using Quicklook any file preview will be rendered.
Its fun to enable, however I recommend installing the Folder Viewer as mentioned in the begging of this post.
How to Enable Remote Disc (Drive Sharing) On Any Mac?
If your Superdrive or disk drive is on the way out (I think mine is) it can be a real pain to change it, especially if its locked inside a MacBook or MacBook Pro. I personally use my disk drive about twice a year. So when the time comes to get something off a CD it can be a major pain to get something off a CD. However there is a solution to this problem. If you take a look at a MacBook Air, Drive Sharing is available, so all the background code is ready to go, we just need to bring it to life. This post is going to cover the entire method of getting drive sharing to work. If you just want the hack, go to the end of the post.
To enable drive sharing, first go to the computer which will host your DVD. If it is a Mac, you can enable DVD sharing. Go to System Preferences > Sharing and check “DVD or CD Sharing”. If you are on a Windows machine (I feel sorry for you), download this package and install it. Under Control Panel open up “DVD and CD Sharing” and check the box which asks if you want to enable Disc Sharing. The host computer is now set up. To save you some time, you can now insert the DVD you want to share.
Here comes the hack. On a MacBook Air this little preference code is already enabled. On other Macs this isn’t the case. Open up Terminal and type the following two lines, press return after each one. There will be no confirmation from Terminal when you have finished. From MacRumors.
defaults write com.apple.NetworkBrowser EnableODiskBrowsing -bool true
defaults write com.apple.NetworkBrowser ODSSupported -bool true
Restart you Mac, when you open Finder again you should see “Remote Disk” in the sidebar (make sure its enabled in Preferences). You can now navigate to the drive as if it was on your own computer. Loading the files takes slightly longer since it has to run over your network. I remember reading somewhere that this wont work over secured Wi-Fi connections, so you have to use a cable for best results.

The Remote Disc option acts like a folder, each drive that is shared will appear as its own entry under “Remote Disk”. This means that you can set up this feature on other Mac’s and share the drives over the network. I personally think this type of trick will be pretty cool if you are in an office environment and constantly handing disks over to each other. If you are really adventurous and have a Mac with lots of USB ports or internal slots (i.e a MacPro) you could make a CD server with lots of disk drives and share each one of them, so every one over a network can access them. However, if it has come to that it may be worth ripping the disk to a disk image and making a ISO server. Fun idea anyway.
Different Bootable Operating Systems On Your Mac

Today we have a guest post by Chris Wanja. He wanted to do a post on creating different bootable disks which you can use on an external hard drive. For example a Leopard Boot and a Snow Leopard Boot. This means you have two different operating systems which you can use and allows you to try things out in different operating systems. This method is slightly different to the bootable backups I did a couple of days ago. The method is quite complicated so you have to follow the instructions quite carefully. I recommend people who know what they are doing attempt this tutorial as you can easily lose all of your data. If you have any questions please leave a comment below or Twitter.
“In the post we cover how to create bootable, clean operating systems as well as bootable installers. Some plus sides to creating a bootable drive is the ability to defragment your own hard-drive. Defragging simply moves broken up sectors on your hard-drive back inline so they are side-by-side. This increases the response of your operating system when you request a file. To read more on defragmentation, check out this Wikipedia article. On a Windows machine, they include the ability to defragment right from inside the operating system. On the Mac, you have to purchase a software CD such as Drive Genius and then boot into that CD. With a bootable operating system, you can load via that and defragment right from there. It is a lot faster over FireWire or USB than a bootable CD. Creating a bootable operating system installer makes things so much faster than installing off a retail copy or grey discs included with your Mac. The latter part of this post will show you how to great a bootable operating system while this next section will show you how to create an installer partition.
Go ahead and plug in and turn on your hard-drive. Insert the retail copy of Tiger, Leopard, Snow Leopard or which OS you would like. Let it mount on your desktop. As soon as it mounts, fire up Disk Utility found in your ~/Applications/Utilities folder. In Disk Utility you are welcomed with a screen that has your local hard-drive and your optical drive. For users on 10.3 or lower, Disk Utility will not mount your optical drive. At this point, you will see your internal hard-drive, CD drive and any external hard-drives connected. Choose the main hard-drive (the brand name) on the left hand side. Across the center, choose the partition tab and create two (2) partitions for every operating system you would like to install; one for the installer and one for the clean boot. Use all of the sizes below to make sure you have enough space partitioned:
- Snow Leopard:
- Install: 12GB
- Operating System: 15GB
- Leopard
- Install: 15GB
- Operating System: 20GB
The picture below shows five (5) different partitions. On a small 500GB disk I have my TimeMachine, 10.5.6 Installer, 10.5.6+ OS, 10.6 Installer and the 10.6 OS. Choose the partition you want to send the installer too. Notice the buttons across the middle box change when you select a specific partition. Go to the “Restore” button. Feel free to read the text at the top, but our focus will be on the input spaces in the lower half of the box. The first box is for your source (the install CD) and below that is for the hard-drive partition you want it to install to.
NOTE: obviously, names of partitions will be different so the Destination box will be different from user to user. Click the “Restore” button, input your password and off it will go. Let the Disk Utility do its thing and about forty-five minutes to a you will be done. By default, your partition will be renamed “Mac OS X Install”; go ahead and rename it for reference later on. I choose the OS version – IE: 10.5.6 Install or 10.6 Install.
Next up is installing a clean operating system on an empty partitioned hard-drive. We just created an faster way to install the operating system, so lets go ahead and use that. Make sure there is an empty partition waiting for your OS install. If not, go back into Disk Utility and create a partition (as described above). Shut down your computer (or restart) and as soon as you see the grey screen hold down the option/alt key – ⌥. This should bring you to the screen show you all bootable drives. You will see your internal drive (Macintosh HD or what you have it named as) and then you will see the partition with the installer you just created. There should be only two drives, so you should not be to confused, try doing it with five different bootable OS and installers. Choose the installer partition and you will be booted into it just as if you were doing it off the CD. Follow the prompts just like you would to re-install. The only difference is when you come to the screen that allows you choose the hard-drive, make sure you choose that empty partition. DO NOT CHOOSE YOUR INTERNAL HARD-DRIVE – it should have a yellow triangle on it. Consider that a big red stop sign and choose the other. Finish the installer and it will reboot. When it reboots it is scripted to go to that operating system it just installed. So make sure you hold down the option / alt key to choose your internal hard-drive (unless you want to go into the new operating system you just created).
You have successfully created a FireWire or USB installer and bootable operating system. There is a couple of different ways of access these new jewels of yours.
- Easiest: restarting and holding down the option / alt key. Then choose the partition you want to access.
- Pain in the neck: Open System Preferences, go to Startup Disk, unlock, and choose the external drive. The reason I call this the pain in the neck method is for two reasons:
- On turn on, the OS will constantly look for that external partition. When it doesn’t find it (because it is not always plugged in) it will default to your internal hard-drive. This adds about ten seconds to the boot time.
- If the drive is plugged in, it will always default to that (until you change it). Making it a pain if you forget”
How to Editing Startup Items On Your Mac?
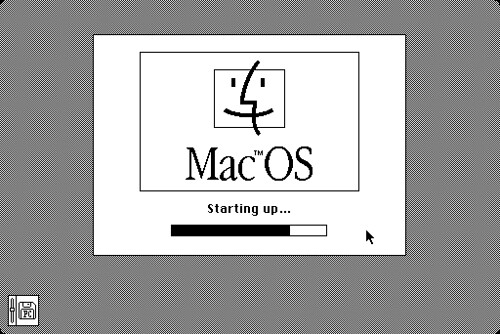
This trick is going to show you how you can modify your start up items. When you Mac boots it will first run the Start Up Items folder, then produce the login screen, finally it would log in and run any login items. There is a slight difference in the two folders (Start Up and Login), as a result you can have different effects.
To find your Start Up Items folder, go to Macintosh HD > Library > StartupItems depending on what you have installed there can be any where between zero entries and a whole leap of folders. Here you can dissect what is going on. If you have an application that misbehaves on bootup, it can be a good bet to move it out of the folder. Anything in this folder will run just after boot, so if you have boot problems, the offending code will probably be in this folder.
I haven’t tested this trick, however, if you want applications to run at boot, place them in a folder within the Startup Items, restart you computer and see of the application runs. This can be useful for running your Mac in kiosk mode or making an application run before you have to log in (such as monitoring apps). Have a play around and see what happens. If anything breaks move it out of the folder and try again.
I have a had a look around for various different resources on the StartupItems folder. At the moment it seems to be trial and error if anything works.
How to disable ads in safari browser?

Sorry for the lack of posts over the last couple of days, University has got really busy and I had no free time at all to do any post. The weekend however has arrived and I have some free time to do some work. Todays post will be about blocking adverts on websites while using Safari. I find that adverts on web pages are getting more an more annoying and some, inevitably, need to be removed from view.
This plugin for Safari is very similar to one for Firefox, called Adblock Plus. They are both designed to block adverts from view. These can include those really annoying half page ones that pop up, or adverts that make no sense and you don’t want to see. Its also very useful if you run on a limited connection and want to save the bandwidth. Some, especially Flash, adverts take up a lot of bandwidth and you may want to remove them.
To install Safar Adblock, head over to this website. Here you can download and install the plugin. You do need Mac OS X 10.5+ and if you are a Snow Leopard user you have to run Safari in 32-bit mode for the plugin to work. Its a useful little plugin which enables your web surfing to be clutter free.


