Monday, August 31, 2009

Disable Autoplay in CD/USB Drive

If you find windows that display an autoplay window that always popup and ask you what to do when you insert a USB device or insert a CD or DVD very annoying. Here is a way to simply turn it off.

1. To open your Group Policy window to configure the “Turn off Autoplay” function of your system. To do this Click on start –> Run –> Type “gpedit.msc“.

Disable Autoplay in CD/USB Drive

2. Click on Administrative Templates, and click on “System”.

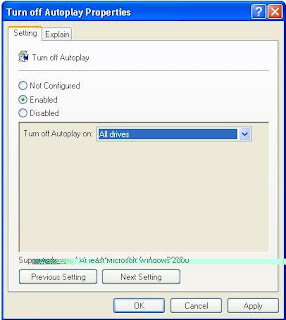
3. Double click on the item called “Turn off Autoplay

Disable Autoplay in CD/USB Drive

4. Set the radio or option button to “Enabled” and change the value of “Turn off autoplay on:” to All Drives (see image above).

5. That’s it you disable the autoplay of USB/CD Drives Window on your computer. Hope you find this very useful.

Sunday, August 30, 2009

Disable Error Report

Disable Error Report

1. Open Control Panel.

2. Click on Performance and Maintenance.

3. Click on System.

4. Then click on the Advanced tab.

5. Click on the error-reporting button on the bottom of the windows.

6. Select Disable error reporting.

7. Click OK.

8. Click OK.

Saturday, August 29, 2009

Follow New TechNetMSDN Downloads on Twitter

Follow New TechNetMSDN Downloads on Twitter
TechNet and MSDN (Microsoft Developer Network) subscribers have access massive collection of full version software products from Microsoft with no time or feature limit, where paid subscription entitles subscribers to not only free downloads and product keys for the software, but also exclusive early access to new software releases, service packs, patches, and beta software before they’re available publicly.

With such an exclusive privileges, many subscribers of TechNet or MSDN will want to be the first one to know when there is new downloads been released or posted on MSDN Subscriber Downloads or TechNet Subscriber Downloads.

Microsoft does provide new downloads RSS for MSDN and TechNet, which everybody can subscribe to the feed.

Beau Giles gava a top that for Twitter maniac, or those who receive faster notification via Twitter followings, both MSDN and TechNet also has two Twitter accounts that can be followed in order to get to know new downloads been released on TechNet and MSDN.

TechNet New Downloads: http://twitter.com/TechNetDownload
MSDN New Downloads: http://twitter.com/MSDNDownloads

Both tweets the latest products added for subscribers (either TechNet or MSDN) to download, which including the highly anticipated Windows 7. For non-subscribers, new downloads in TechNet or MSDN also provide advantage of having insight into when a general public release will be available, which is likely to be sooner rather than later.

Friday, August 28, 2009

FlushReset DNS Cache

FlushReset DNS Cache

DNS (Domain Name System) is a resolution mechanism to translate, resolve and return real IP address of the serving machine against the fully qualified domain name of the URL (Uniform Resource Locator), aka link location. Whenever a domain has been resolved, the DNS resolution is stored and cached locally for future use.

The caching of DNS on local system ensure the fastest speed to resolve any domain name, and reducing hits, and directly load and burn of DNS name servers. However, it may cause some issues such as some websites and web pages not loading or cannot be contacted and connected when browsing, causing by changing of IP address or nameservers that hasn’t been reflected and refreshed on local copy.

The symptom is more obvious when user set web browser to use proxy to surf the Internet, and these sites now can be loaded properly.

When encountering any inaccessible or unable to load web page issue, one possible resolution is to try to flush (empty and reset) the DNS cache on the system. To flush the DNS on Windows system (Windows XP and Vista inclusive), follow these steps:

Click on Start button and then click on Run (alternatively just hit Windows + R keys) to open Run command dialog. Type Cmd into the Run box, and hit Enter. In Windows Vista, open an elevated command prompt.

A command prompt DOS window will open. Type ipconfig /flushdns and then press Enter to purge the DNS resolver cache.

Thursday, August 27, 2009

Shake Your Browser

This is a fun little trick that can create a shaking screen on your web browser (Like Internet Explorer,etc..)

The trick is simply a small Java Script that causes your browser window to move to different positions, causing a shake of your entire screen. It's kind of cool to watch and see what Java Script can do! Try it out..

Use this trick at your own risk.

Here's how:
Copy this entire line and paste it onto your address box, then press Enter:

javascript:function Shw(n) {if (self.moveBy) {for (i = 35; i > 0; i--) {for (j = n; j > 0; j--) {self.moveBy(1,i);self.moveBy(i,0);self.moveBy(0,-i);self.moveBy(-i,0); } } }} Shw(6)

Example:

Shake Your Browser

Wednesday, August 26, 2009

Use free zong Internet in Pakistan

Use free zong Internet in Pakistan

Hello friends, Today i am telling about how can you use free internet in your mobile with ZONG in 2 simple Steps:

STEP: (1) Please type your mobile write option message
InternetMobile company NameMObile Model
And send 131
Please save your settings


STEP: (2) And then Go Internet setting profile
Edit: APN
Change your APN & Type this One
APN: Wapgw: 10.81.6.33

Use Free Internet & enjoy.....

Tuesday, August 25, 2009

Create Hidden Admin Account in Windows XP

Create Hidden Admin Account in Windows XP

Since we are going to do all the Editing in Window Registry it is Recommended to Back Up the Registry before going Further.
After you have Backed up your registry follow the Steps to Create your Hidden Account:

First Goto Start -> Run -> Type regedit -> Enter
In the Left Menu goto,

HKEY_LOCAL_MACHINE\Software\Microsoft\WindowsNT\CurrentVersion\Winlogon\SpecialAccounts\UserList

In the Right pane, Right click -> New -> String Value

Right click on the new String Value and click Rename

Type the Name of the Account you want to hide.

Hit Enter then Right click on the String Value again and Change value to 0 which hides it. If you want it to be Visible to all Enter the Value 1.

Now Save and Exit the Registry and Logoff.

Goto welcome screen and Hit ctrl+alt+del twice to bring up Logon prompt

Type hidden Accounts name and password

Enjoy!!!

Monday, August 24, 2009

Your Name On System Clock

This tip is absolutely and completely useless, and will even make applications that depend on timestamps have issues. It's mostly just to be used as a cool trick you can show off to your friends, so we're going to show you how it works.
The way this trick works is by modifying the regional settings for the time format. Instead of using just AM or PM, you can put up to 12 characters of text in that field.

Your Name On System Clock

Start by opening Regional and Language Options from the start menu search box or the control panel.

Your Name On System Clock

On the Formats tab you'll see the "Customize this format" button, which you'll need to choose.
Your Name On System Clock

Select the Time tab, and then here's where we can make whatever settings we want.

Your Name On System Clock

I chose to set mine to "AM - Geek" so I could still see AM or PM, but you can choose any 12 characters for either field. Keep in mind that the PM symbol is only going to display during the "PM" hours.
This does change more than just the displayed clock, so I'd advise not using this on a computer you do actual work on. Using the F5 key in notepad shows the "Geek" text as well:

Your Name On System Clock

It's one of those things that's interesting to know… just not very useful. It does work in XP as well.

Sunday, August 23, 2009

Turn XP into a Mac

Turn XP into a Mac
  1. Remove all unused shortcuts and icons. Right click the desktop and go to “Arrange desktop icons by” and uncheck “Show desktop icons”. You should now have a completely clean desktop. Don’t be afraid. You can still access the My Computer, My Documents, and Recycle Bin standbys from Windows Explorer.
  2. Install RKLauncher. RKLauncher (also called RKDock) is a free Windows version of the animated Mac taskbar, or “dock.” You can download it here. RKLauncher comes with a pretty cool theme. If you want to make your dock look exactly like a Mac though, try RealDock for RKLaucher, a great clone of the Mac Dock appearance. RKLauncher’s official build hasn’t been updated lately, so if you would like something more up-to-date, grab a nightly build from Aqua-Soft. The farther down you go, the newer the build. Another good dock program is ObjectDock by Stardock, you can skin it to be anything you want and it does the animations and everything.
  3. Hide the taskbar. It doesn’t make sense to have both ObjectDock/RKDock and the Windows taskbar. Right click a blank space in ObjectDock, go to the settings tab, select behavior then on the box with check marks select “Hide the Windows Taskbar”, and hit OK. RKLauncher should work similarly. This makes the taskbar disappear. You can also just move the taskbar to the front of the screen.
  4. Add Widgets. Widgets are desktop toys to entertain and to inform. Think of them like things you’d put on a real desk: a picture frame, a newspaper to a dancing hula girl! But they’re on your PC desktop, not your real desk. You’ll get it once you see it. They could be a fun addition to your boring computer. Download free widgets from the Yahoo Widgets page. You’ll download a widget machine called Yahoo! Widget Engine, which comes with widgets like a picture frame, analog clock, calendar, and weather display. You can get more widgets like RSS news feeds and a dancing hula girl from the widgets gallery. Yahoo! has also released an engine that can help you make your own widgets and is available here
  5. Get Safari for Windows Just Get the new Safari 3 Beta, for Windows here, or get Firefox here. You can skin Firefox to look like Safari.
  6. Change your wallpaper to look like Mac OS X Tiger. Or you can get a high resolution wallpaper here which won’t make your computer mimic a mac desktop but will add a sense of style and a unique touch.
  7. Install your Expose from docs.kr. With this program (screen shot shows the ‘Windows Vista Flip’ move) you can set your Windows to spread out at the stroke of a key! A free download!
  8. Move your buttons. ShellWM is a “titlebar-only” shell replacer. It lets you have the maximize, minimize and close buttons on the left for free. You’ll want to download this theme.
  9. Change your mouse pointers. For the full effect, download a new set of mouse pointers. Save these to your computer (preferably in C:\WINDOWS\Cursors). It may be a good idea to make a folder within this for easier setup.) To setup these cursors, choose Mouse from the Control Panel, click the Pointers tab, and set your new pointers appropriately. For a the best OS pointer, use FLyakiteOS. If you don’t feel like changing cursors manually, you can install them all with a simple Mac OS X Mouse Cursors Installer
  10. Keep tweaking and playing. Try customizing all of the applications you downloaded. Whatever suits you!

Saturday, August 22, 2009

Run A Board forum From Your Pc

Run A Board forum From Your Pc
If you wish to install php and mysql to run a phpBB installation on your computer, first you will need installers. Most of you have windows, so I recommend FoxServ. This is a great program that installs php, mysql, and more on your windows machine in under a minute, excluding download time.


Download foxserv 3.0 from www.foxserv.net/


Run the foxserv install program, it is pretty self explanatory, just do what it says.


After you get everything installed, run the foxserv control panel and click the install buttons for everything.


Open winmysql ADMIN. Create a new username and password at the start-up, and then create a new database, the one you will be using for your phpBB installation.


Now download phpBB 2.0.x from phpbb.com, or download phpBBplus from phpBB2_plus_1.2.zip


Unzip the phpBB2 folder into C:\Foxserv\www\


After you have done such, visit http://localhost/phpBB2/ to view your install page. enter the correct information.
database name: the name of the database you created.
database username: username you created
database password: password you created


then enter your email information and everything else as it should be. Now delete the install and contrib directories from the phpBB2 folder on your computer.


Voila! All set up. If you want to have other people view your site, then you need a forwarding service. I have a dynamic IP, so I use www.dynu.com. Register an account there and follow all of their instructions if you have a dynamic IP. Now you should visit http://yoursite.dynu.com/ to make sure everything worked.


Also, windows xp users BE SURE TO INSTALL SERVICE PACK 1. SP1 fixes critical incompatibility issues with the apache 2.x server that prevents it from using php correctly. If you do not have service pack one, php pages will load incorrectly or not at all on your webserver.


I posted this because I was fed up with trying to find a host that supports php and mysql and doesnt have any ads on it.


NOTE: You wont get any HOST that will allows you WAREZ, then you can use your own pc as your own HOST

another program that works well is phpdev5 i have used it for a long time. and another site to register a dns name is http://dyndns.org it gives you better names.

Wednesday, August 12, 2009

Free Converter for *.swf To *.flv

Free Video To Flash Converter

Here is a freeware called Free Video to Flash Converter with which you can easily convert video files to flash format.It is a powerful, reliable and yet easy-to-use and simple application that will allow you to convert video files to SWF or FLV to publish video on your web site or blog.The video formats supported are AVI, MPEG, MP4, WMV, MOV, 3GP, DVR-MS these can be converted to *.swf or *.flv.

Free Video To Flash Converter

Free Video To Flash Converter


Tuesday, August 11, 2009

Update your BIOS

Update your BIOS

Having an updated BIOS is good for a healthy PC . Here is the tweet you can

Please read the following instructions carefully before starting a Flash BIOS upgrade:
A. Create a Bootable Floppy (in DOS)

•With a non-formatted disk, type the following:

format a:/s

•If using a formatted disk, type:

sys a:

This procedure will ensure a clean boot when you are flashing the new BIOS.

B. Download the BIOS file

•Download the correct BIOS file by clicking on the file name of the BIOS file you wish to download.

•Save the BIOS file and the Flash Utility file in the boot disk you have created. Unzip the BIOS file and the flash utility file. If you don't have an "unzip" utility, download the WinZip for Windows 95 shareware/ evaluation copy for that one time use from _www.winzip.com or _www.pkware.com. Most CD ROMs found in computer magazines, have a shareware version of WinZip on them.

•You should have extracted two files:

Flash BIOS utility eg: flash7265.exe (for example)

BIOS eg: 6152J900.bin (example)

Use the latest flash utility available unless otherwise specified (either on the BIOS update page or in the archive file). This information is usually provided.

C. Upgrade the System BIOS

During boot up, write down the old BIOS version because you will need to use it for the BIOS backup file name.

Place the bootable floppy disk containing the BIOS file and the Flash Utility in drive a, and reboot the system in MS-DOS, preferably Version 6.22

•At the A:> prompt, type the corresponding Flash BIOS utility and the BIOS file with its extension.

For example:

flash625 615j900.bin

•From the Flash Memory Writer menu, select "Y" to "Do you want to save BIOS?" if you want to save (back up) your current BIOS (strongly recommended), then type the name of your current BIOS and its extension after FILE NAME TO SAVE: eg: a:\613J900.bin

Alternatively select "N" if you don't want to save your current BIOS. Beware, though, that you won't be able to recover from a possible failure.

•Select "Y" to "Are you sure to program?"

•Wait until it displays "Message: Power Off or Reset the system"

Once the BIOS has been successfully loaded, remove the floppy disk and reboot the system. If you write to BIOS but cannot complete the procedure, do not switch off, because the computer will not be able to boo, and you will not be given another chance to flash. In this case leave your system on until you resolve the problem (flashing BIOS with old file is a possible solution, provided you've made a backup before)

Make sure the new BIOS version has been loaded properly by taking note of the BIOS identifier as the system is rebooting.

For AMI BIOS
Once the BIOS has been successfully loaded, remove the floppy disk and reboot the system holding the "END" key prior to power on until you enter CMOS setup. If you do not do this the first time booting up after upgrading the BIOS, the system will hang.

BIOS Update Tips
note:
1.Make sure never to turn off or reset your computer during the flash process. This will corrupt the BIOS data. We also recommend that you make a copy of your current BIOS on the bootable floppy so you can reflash it if you need to. (This option is not available when flashing an AMI BIOS).

2. If you have problems installing your new BIOS please check the following:

Have you done a clean boot?
In other words, did you follow the above procedure for making a bootable floppy? This ensures that when booting from "A" there are no device drivers on the diskette. Failing to do a clean boot is the most common cause for getting a "Memory Insufficient" error message when attempting to flash a BIOS.

If you have not used a bootable floppy, insure a clean boot either by

a) pressing F5 during bootup

b) by removing all device drivers on the CONFIG.SYS including the HIMEM.SYS. Do this by using the EDIT command.

Have you booted up under DOS?
Booting in Windows is another common cause for getting a "Memory Insufficient" error message when attempting to flash a BIOS. Make sure to boot up to DOS with a minimum set of drivers. Important: Booting in DOS does not mean selecting "Restart computer in MS-DOS Mode" from Windows98/95 shutdown menu or going to Prompt mode in WindowsNT, but rather following the above procedure (format a: /s and rebooting from a:\).

Have you entered the full file name of the flash utility and the BIOS plus its extension?
Do not forget that often you will need to add a drive letter (a:\) before flashing the BIOS. Example: when asked for file name of new BIOS file which is on your floppy disk, in case you're working from c:\ your will need to type a:\615j900.bin, rather than 615j900.bin only.

Monday, August 10, 2009

Boot your PC in 10 seconds

Boot your PC in 10 seconds
Do you want your PC to just Boot within 10 seconds?
Then Just follow this trick and see the magic,


Click on the start button then press R it will take u to Run well go to run
n type Regedit
press enter
this will open Registery Editor
now look for the key

HKEY_LOACAL_MECHINE\SYSTEM\CurrentControlSet\Control\ContentIndex

now there find the Key Called
"Startup Delay"
Double Click On It

Now where its Base

Click Decimal

Now its Default Value Is 4800000

Change The Value To 40000

here u go u have done it
now close the Registery Editor and Restart Your Computer
You'll See The Result

Sunday, August 9, 2009

Web Design FullForms

Web Design

HTML --> Hyper Text Markup Language

SGML --> Standard Generalised Markup Language

HTTP --> Hyper Text Transfer Protocol

ISP --> Internet Service Provider

JPEG --> Joint Photographic Expert Group

MPEG --> Moving Photographic Expert Group

GIF --> Graphical Interchange Format

ASCII --> American Standard Code for Information Interchange.

LAN --> Local Area Network

ASP --> Active Server Pages

XML --> eXensible Markup Language

TCP --> Transmission Control Protocol

IP --> Internet Protocol

ARPA --> Advanced Research Project Agency

E-Mail --> Electronic Mail

WWW --> World Wide Web

BBS --> Bulletin Board System

DNS --> Domain Name Server.

DSU --> Digital Services Unit

EDI --> Electronic Data Interchange

FAQ --> Frequently Asked Questions

FTP --> File Transfer Protocol

GUI --> Graphical User Interface

CUI --> Character User Interface

IAB --> Internet Architecture Board

IETF --> Internet Engineering Task Force

ISDN --> Internet Services Digital Network

SMTP --> Simple Mail Transfer Protocol

MIME --> MultiPurpose Internet Mail Extensions

NCSA --> National Center for SuperComputing Applications

NFS --> Network File System

NIC --> Network Information Center

NOC --> Network Operations Center

NREN --> National Research and Education Network.

OSI --> Open System Interconnection

SLIP --> Serial Line Internet Protocol

TIFF --> Tagged Image File Format

URL --> Uniform Resource Locator

WAIS --> Wide Area Information Service.

href = Horizontal Reference

img = Image

src = Source

br --> Break

hr --> Horizontal Ruler

wbr --> Word Break

OL --> Ordered List

UL --> Unordered List

DL --> Definition List

LI --> List

Father of HTML --> Tim Bernes lee

Father of INTERNET --> Vincent Cerf

table
****
tr --> Table Row
th --> Table Heading
td --> Table Data

Saturday, August 8, 2009

Attacks on Twitter,FaceBook by Hackers

Attacks on Twitter,FaceBook by Hackers

Facebook and Twitter were attacked by hackers on August 6.The attackers has used denial-of-service attack.It is believed that same attacker or group of same attackers have have attacked both the sites.Internet users were thwarted from logging on to Twitter for several hours and Facebook members saw delays logging in and accessing their online profiles, raising speculation of a co-ordinated campaign against the two sites.

Facebook issued an early statement on its site saying that, "Earlier this morning, Facebook encountered network issues related to an apparent distributed denial-of-service attack that resulted in degraded service for some users.

The service--while was restored later Thursday. Meanwhile, the company said in its status blog that it was "continuing to defend against and recover from this attack."

The hackers have used denial of service or DOS attack on both the sites In a denial-of-service attack a Web site or server is bombarded with more traffic than it can handle, effectively causing online congestion. Such attacks are done from multiple computers and usually hackers send malware data to the target site in unison. After initial denial of any such attack, both Facebook and Twitter have now acknowledged attack on their site by denial-of-service attack.

Tuesday, August 4, 2009

How to Prevent Spam Mails from Orkut!

Prevent Spam Mails

TRICK 1 :

1. Change your Primary Mail

a) Log in to Orkut > Go To Edit Profile!
b) Click on Contact tab and change your Primary Email address to some other id, which you don't use much.
c) Your login id will remain same but your friends will see your other email id and mails will be sent there.


TRICK 2 :

1. Log in to Orkut then Go to Settings > Notifications.

2. Now you will see the option that there are many notifications which orkut sends you by mail. Uncheck the unnecessary options to prevent spam.

3. Thats it, You are done. Enjoy!

Monday, August 3, 2009

AUTO DELETE TEMPORARY FOLDER

AUTO DELETE TEMPORARY FOLDER

what i prefer is %temp% " without quotes..

at Start -> Run..
this opens ur temp folder n den u cal erase it neatly// still try dis one too..


First go into gpedit.msc
Next select -> Computer Configuration/Administrative Templates/Windows Components/Terminal Services/Temporary Folder
Then right click "Do Not Delete Temp Folder Upon Exit"
Go to properties and hit disable. Now next time Windows puts a temp file in that folder it will automatically delete it when its done! Note from Forum Admin: Remember,
GPEDIT (Group Policy Editor) is only available in XP Pro.

Sunday, August 2, 2009

Super Speedy Shutdown

Pc super fast Shutdown


Some time ago I published a tip for forcing Windows to shutdown quickly, without worrying about exiting running programs and the other behind the scenes goings on that can make shutting down Windows XP a long and tedious business, and that’s without having to contend with unresponsive programs. Well, here’s another one, this time using a command entered in Run on the Start menu.


The command in question is shutdown.exe, and just by typing ‘shutdown -s’ will start the normal shutdown process, but we can beef it up a bit by adding some command line ‘switches’. These are extra instructions that tell it to do things in a certain way. Putting –f after the shutdown command, for example, tell it to force the shutdown, closing running applications without any warning.

Here’s another one, adding –t xx tells your PC to wait a specified amount of time (xx represents time in seconds), before shutting down.

So here is an example command, and feel free to modify the switches and time delay to suit your way of working: ‘shutdown –f –s –t 3’.


If you want to experiment here’s some other switches. –r restarts the computer, -c “text” lets you add a comment to the shutdown dialogue box (up to 127 characters) –l tells Windows to you to logoff the user.

 
Powered by Blogger