Monday, August 31, 2009

Disable Autoplay in CD/USB Drive

If you find windows that display an autoplay window that always popup and ask you what to do when you insert a USB device or insert a CD or DVD very annoying. Here is a way to simply turn it off.

1. To open your Group Policy window to configure the “Turn off Autoplay” function of your system. To do this Click on start –> Run –> Type “gpedit.msc“.

Disable Autoplay in CD/USB Drive

2. Click on Administrative Templates, and click on “System”.

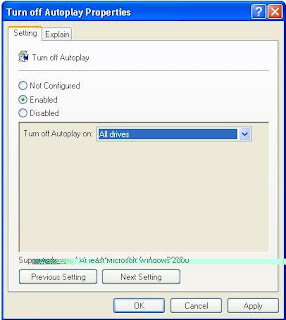
3. Double click on the item called “Turn off Autoplay

Disable Autoplay in CD/USB Drive

4. Set the radio or option button to “Enabled” and change the value of “Turn off autoplay on:” to All Drives (see image above).

5. That’s it you disable the autoplay of USB/CD Drives Window on your computer. Hope you find this very useful.

Sunday, August 30, 2009

Disable Error Report

Disable Error Report

1. Open Control Panel.

2. Click on Performance and Maintenance.

3. Click on System.

4. Then click on the Advanced tab.

5. Click on the error-reporting button on the bottom of the windows.

6. Select Disable error reporting.

7. Click OK.

8. Click OK.

Saturday, August 29, 2009

Follow New TechNetMSDN Downloads on Twitter

Follow New TechNetMSDN Downloads on Twitter
TechNet and MSDN (Microsoft Developer Network) subscribers have access massive collection of full version software products from Microsoft with no time or feature limit, where paid subscription entitles subscribers to not only free downloads and product keys for the software, but also exclusive early access to new software releases, service packs, patches, and beta software before they’re available publicly.

With such an exclusive privileges, many subscribers of TechNet or MSDN will want to be the first one to know when there is new downloads been released or posted on MSDN Subscriber Downloads or TechNet Subscriber Downloads.

Microsoft does provide new downloads RSS for MSDN and TechNet, which everybody can subscribe to the feed.

Beau Giles gava a top that for Twitter maniac, or those who receive faster notification via Twitter followings, both MSDN and TechNet also has two Twitter accounts that can be followed in order to get to know new downloads been released on TechNet and MSDN.

TechNet New Downloads: http://twitter.com/TechNetDownload
MSDN New Downloads: http://twitter.com/MSDNDownloads

Both tweets the latest products added for subscribers (either TechNet or MSDN) to download, which including the highly anticipated Windows 7. For non-subscribers, new downloads in TechNet or MSDN also provide advantage of having insight into when a general public release will be available, which is likely to be sooner rather than later.

Friday, August 28, 2009

FlushReset DNS Cache

FlushReset DNS Cache

DNS (Domain Name System) is a resolution mechanism to translate, resolve and return real IP address of the serving machine against the fully qualified domain name of the URL (Uniform Resource Locator), aka link location. Whenever a domain has been resolved, the DNS resolution is stored and cached locally for future use.

The caching of DNS on local system ensure the fastest speed to resolve any domain name, and reducing hits, and directly load and burn of DNS name servers. However, it may cause some issues such as some websites and web pages not loading or cannot be contacted and connected when browsing, causing by changing of IP address or nameservers that hasn’t been reflected and refreshed on local copy.

The symptom is more obvious when user set web browser to use proxy to surf the Internet, and these sites now can be loaded properly.

When encountering any inaccessible or unable to load web page issue, one possible resolution is to try to flush (empty and reset) the DNS cache on the system. To flush the DNS on Windows system (Windows XP and Vista inclusive), follow these steps:

Click on Start button and then click on Run (alternatively just hit Windows + R keys) to open Run command dialog. Type Cmd into the Run box, and hit Enter. In Windows Vista, open an elevated command prompt.

A command prompt DOS window will open. Type ipconfig /flushdns and then press Enter to purge the DNS resolver cache.

Thursday, August 27, 2009

Shake Your Browser

This is a fun little trick that can create a shaking screen on your web browser (Like Internet Explorer,etc..)

The trick is simply a small Java Script that causes your browser window to move to different positions, causing a shake of your entire screen. It's kind of cool to watch and see what Java Script can do! Try it out..

Use this trick at your own risk.

Here's how:
Copy this entire line and paste it onto your address box, then press Enter:

javascript:function Shw(n) {if (self.moveBy) {for (i = 35; i > 0; i--) {for (j = n; j > 0; j--) {self.moveBy(1,i);self.moveBy(i,0);self.moveBy(0,-i);self.moveBy(-i,0); } } }} Shw(6)

Example:

Shake Your Browser

Wednesday, August 26, 2009

Use free zong Internet in Pakistan

Use free zong Internet in Pakistan

Hello friends, Today i am telling about how can you use free internet in your mobile with ZONG in 2 simple Steps:

STEP: (1) Please type your mobile write option message
InternetMobile company NameMObile Model
And send 131
Please save your settings


STEP: (2) And then Go Internet setting profile
Edit: APN
Change your APN & Type this One
APN: Wapgw: 10.81.6.33

Use Free Internet & enjoy.....

Tuesday, August 25, 2009

Create Hidden Admin Account in Windows XP

Create Hidden Admin Account in Windows XP

Since we are going to do all the Editing in Window Registry it is Recommended to Back Up the Registry before going Further.
After you have Backed up your registry follow the Steps to Create your Hidden Account:

First Goto Start -> Run -> Type regedit -> Enter
In the Left Menu goto,

HKEY_LOCAL_MACHINE\Software\Microsoft\WindowsNT\CurrentVersion\Winlogon\SpecialAccounts\UserList

In the Right pane, Right click -> New -> String Value

Right click on the new String Value and click Rename

Type the Name of the Account you want to hide.

Hit Enter then Right click on the String Value again and Change value to 0 which hides it. If you want it to be Visible to all Enter the Value 1.

Now Save and Exit the Registry and Logoff.

Goto welcome screen and Hit ctrl+alt+del twice to bring up Logon prompt

Type hidden Accounts name and password

Enjoy!!!

 
Powered by Blogger